AI can spot signs of metadata tampering, but it can’t prove a file is real or who owns it on metadata alone. If you need to check a photo, video, or audio file, I’d start with three steps: make a verified copy, compare metadata with more than one tool, and use AI to look for conflicts between timestamps, device data, file structure, and the media itself.
Here’s the short version:
- Protect the source first. I’d work from a forensic copy and hash it with SHA-256 before any review.
- Check metadata with multiple tools. Tools like ExifTool, MediaInfo, and FFprobe can return different results, and those gaps can matter.
- Let AI score risk, not make the final call. A single odd field means little. A cluster of mismatches matters more.
- Compare claims to the media. If the metadata says one thing but the image, video, or audio suggests another, that’s a warning sign.
- Label findings clearly. I’d separate EXTRACTED file data from INFERRED model findings so legal and compliance teams can read the report with less confusion.
- Use more than metadata. Watermarks, content matching, and early hash timestamping help when metadata is stripped or changed.
A few facts stand out from the article: GPS data can place a device within about 20 meters in some cases, SHA-256 hashing gives you a fixed file fingerprint, and blockchain timestamping can show a file existed in the same state at a given time without uploading the media itself.
If I had to sum it up in one line, it would be this: AI is best used to flag risk, sort files for review, and support a clean evidence trail.
That’s the core idea behind the workflow below.
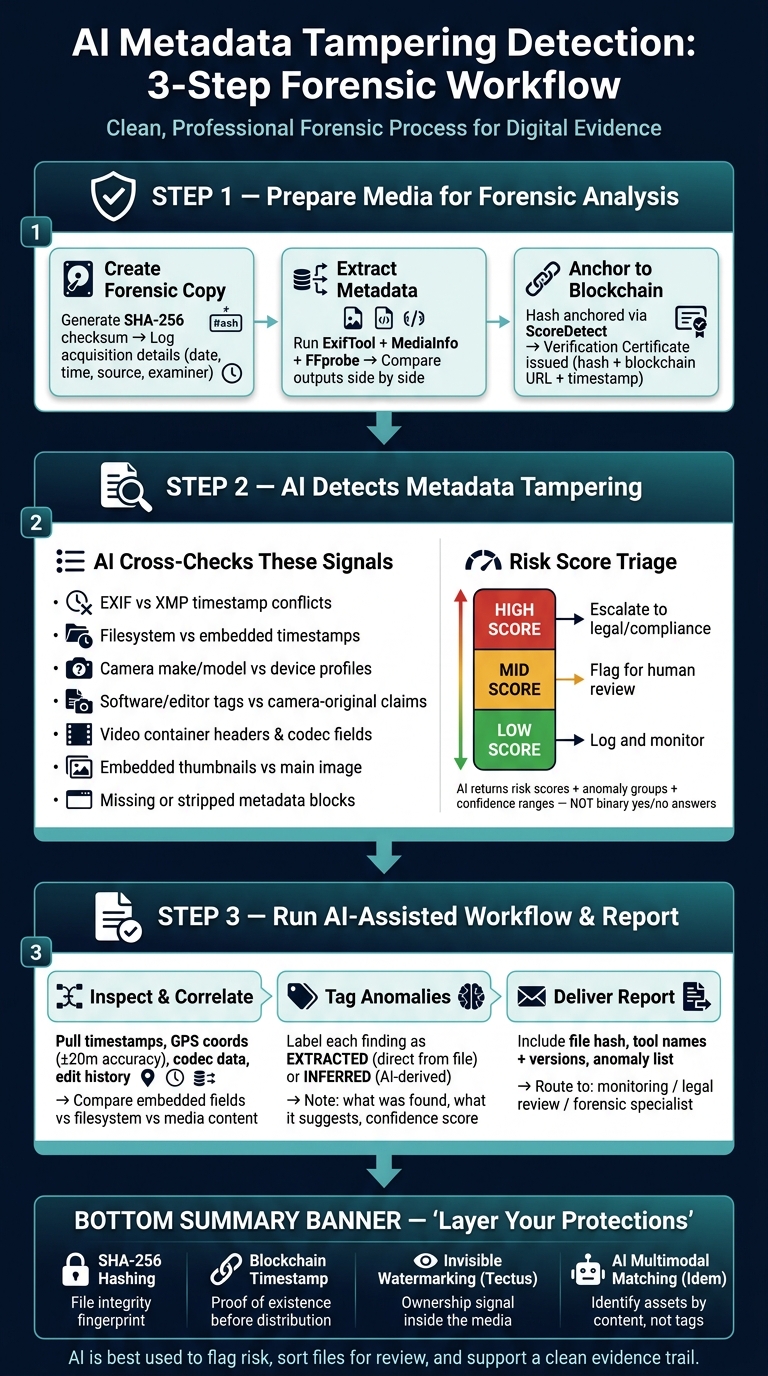
AI Metadata Tampering Detection: 3-Step Forensic Workflow
Webinar: How to Detect Document Fraud & Image Tampering
sbb-itb-738ac1e
Step 1: Prepare Media for Forensic Analysis Without Altering Evidence
Before you analyze anything, protect the original file and do all work on verified copies. That step matters if you may need to use the results in a legal or compliance review. If the source file changes, even by accident, the rest of the process gets shaky fast.
Create Forensic Copies and Hash the Files
Start by making a forensic copy of the original file. Then generate a SHA-256 checksum to confirm the copy’s integrity.
Right after copying, log the acquisition details: the date and time, file source, storage location, and examiner name. This chain-of-custody record shows what was collected, when it was collected, and who handled it. That record gives you a clean baseline, which makes later AI-based comparisons easier to defend.
Extract Metadata with Multiple Tools and Log the Results
Use more than one tool because metadata parsers don’t always read the same file the same way. Run ExifTool, MediaInfo, and FFprobe on the forensic copy, then compare the outputs side by side.
Those differences can tell you a lot. A parsing gap may point to tampering, or it may show a blind spot in one tool. Either way, it’s worth noting. AI systems often flag issues when metadata fields conflict with each other or don’t line up with what the media itself shows.
Record the fields returned by each tool, and document any mismatched timestamps or unexpected changes. When metadata is part of the evidence, the mismatches matter just as much as the field values. Those gaps often become the signals AI uses to mark possible tampering.
Anchor File Checksums with Blockchain Timestamping
You can also anchor the SHA-256 hash to a timestamped record to show that the file existed in that exact state at a specific time. ScoreDetect, a product of InCyan, does this by anchoring the checksum to the blockchain without storing the media file itself.
That means the media stays in your custody, while the hash creates a verifiable record of the file’s state. A Verification Certificate can include the hash, blockchain URL, and registration time, giving you clear proof before analysis.
With the evidence preserved, the next step is to compare metadata claims against the file’s content and device signals.
Step 2: How AI Detects Metadata Tampering
Once you have your forensic copy hashed and your metadata logs ready, the next job is the detection itself. Here’s the key idea: AI looks for conflicts across layers, not just one bad field.
Cross-Check Timestamps, Device Fingerprints, and File Structure
The strongest sign is usually a contradiction between fields. A file may claim to be a camera original, for instance, but also include editing software tags, an XMP modification date that clashes with the EXIF capture date, or an embedded thumbnail that doesn’t match the main image. One flag alone doesn’t prove tampering. But when several conflicts show up together, the risk goes up.
Those conflicts become the first batch of signals AI scores. It weighs them together, not one by one. The table below shows common checks and what they may point to:
| Metadata Check | What It Can Indicate | Signal Strength |
|---|---|---|
| EXIF/XMP timestamp comparison | Backdated or inconsistent capture/edit times | Medium to high when multiple timestamps disagree |
| Filesystem vs. embedded timestamps | Copying, re-saving, or altered file history | Medium; filesystem times are easy to change independently |
| Camera make/model and lens fields | False device-origin claims | Medium; most useful when matched with known device profiles |
| Software/editor tags | Post-capture processing through editing software | High when present alongside a camera-original claim |
| Video container headers | Re-encoding, truncation, or malformed structure | High for format and structure anomalies |
| Codec fields and stream metadata | Transcoding or mismatched encoding claims | Medium to high |
| Embedded thumbnails | Partial editing or inconsistent recompression | Medium |
| Missing metadata blocks | Stripped or sanitized provenance data | Medium; absence is suspicious but not definitive |
Compare Metadata Claims Against the Visible or Audible Content
AI also checks whether the content itself fits the metadata story. Lighting, shadows, weather, scene geometry, motion blur, compression, and audio context can all help show whether a metadata claim makes sense.
For audio, the same idea applies. Spectral analysis can show splices, level shifts, or encoding artifacts that don’t fit the claimed recording history. When several content-based cues line up against the metadata claim, confidence in that finding goes up.
Use Risk Scores Instead of Binary Answers
AI should return risk scores, anomaly groups, and confidence ranges – not a simple yes-or-no answer. Cloud storage, software updates, and format conversions can all leave traces that look suspicious when viewed alone.
A risk-score model gives your team a clean way to triage:
- A low score means log and monitor
- A mid-range score means flag for human review
- A high score means escalate to legal or compliance
It also helps to use systems that separate extracted fields from AI-inferred findings [3]. That way, your team can see what came straight from the file and what the model inferred. And that matters, because any single anomaly should be treated as a lead, not a final call.
Use those scores to sort files before moving into the image, video, and audio workflow in Step 3.
Step 3: Run a Practical AI-Assisted Workflow for Images, Video, and Audio
Inspect, Compare, and Correlate Findings
Use the Step 2 risk score to decide which files move into this workflow. After you score a file in Step 2, focus your review on the highest-risk cases first.
Begin with a local extraction tool on the forensic copy. Pull timestamps, device identifiers, geolocation, codec data, and edit history. Then compare embedded fields, filesystem timestamps, and the media itself in a single pass.
This is where small cracks start to show. Watch for missing values where data should exist, timestamp conflicts between the filesystem and embedded fields, and geolocation coordinates that don’t fit the claimed capture context. Also note any mismatch between the metadata and what you can see in the image, the video frames, or the waveform.
When location data is part of the case, check GPS coordinates against outside records when you can. That step matters because location metadata can narrow a device’s position to about 20 meters and, in some cases, estimate elevation to show which floor of a building the device was on [1].
Document Anomalies in a Report Legal, Compliance, and Leadership Teams Can Use
Once you spot anomalies, turn them into a report that legal and compliance teams can work with. Include the file hash, the tools used, their version numbers, and the list of files reviewed.
Tag each anomaly as EXTRACTED or INFERRED. That plain label does a lot of work. It tells the reader whether a finding came straight from the file or from analysis based on the file.
For each finding, note:
- what was found
- what it suggests
- the confidence score tied to it
Make the labels clear enough that a non-technical reader won’t confuse an inferred anomaly with direct evidence. Then use the report to route the file to monitoring, legal review, or deeper forensic analysis.
Map Tools to Tasks with a Reference Table
Match each task to the method that handles it best.
| Task | Tool / Method | What It Does in This Workflow |
|---|---|---|
| Metadata extraction | Local extraction tool | Extracts metadata without cloud transmission during the initial pass |
| Content correlation | Compare metadata against media content | Checks whether the media supports the metadata claim |
| Location verification | Geofence analysis | Compares timestamps and coordinates against a defined area |
| Anomaly detection | AI anomaly scoring | Checks AI conclusions against edge cases and high-risk scenarios |
| Confidence tagging | EXTRACTED / INFERRED labels | Separates direct metadata reads from AI-derived conclusions |
| Reporting | Structured forensic report | Delivers hashes, tool versions, anomaly lists, and a plain-English summary |
| Review escalation | Guardrails and escalation rules | Makes sure a person reviews the case when the AI reaches an uncertain conclusion |
Once the report is done and the findings are tagged with confidence scores, you have a clean handoff point. From there, the file can go to a forensic specialist for deeper analysis or straight to legal and compliance teams for action.
Build a Stronger Protection Strategy Beyond Metadata Alone
Pair Metadata Forensics with Watermarking and Matching
Once you spot tampering, the next step is to protect the asset with layers. Metadata can be stripped, edited, or rewritten, so it should be treated as one signal, not final proof.
That’s where invisible watermarking and multimodal matching come in. InCyan’s Tectus places an invisible watermark right inside the media itself, whether that’s an image, video, or audio file. So even if outside metadata disappears, the ownership signal can still remain.
InCyan’s Idem takes a different route. It uses AI-powered multimodal matching to identify assets based on what’s actually in the file – what can be seen or heard – instead of relying on tags or file details. Used together, Tectus and Idem help cover the gap that metadata tampering creates.
Where ScoreDetect Fits in an Enterprise Workflow
For prevention, timestamp the original before it leaves your hands. ScoreDetect, a product of InCyan, anchors a file checksum to the blockchain as early proof of existence.
The best time to use ScoreDetect is at the very start of the asset lifecycle, before distribution begins. If a dispute shows up later, that blockchain record gives your team an objective point of reference that can’t be changed after the fact.
Key Takeaways for Business Teams
For business teams, the main priorities are pretty simple:
- Preserve and timestamp early. Always start from a secure, hashed forensic copy, and anchor checksums to the blockchain as soon as an asset is created. If you wait until a dispute starts, the evidence loses a lot of its weight.
- Use AI to cross-check, not conclude. Risk scores and anomaly flags should guide human review, not replace it. That helps legal and compliance teams triage issues faster and escalate with more confidence. [2][3]
- Layer your protections. Combine metadata forensics with invisible watermarking through Tectus and multimodal matching through Idem, so ownership can still be checked even after metadata is stripped or changed.
Metadata forensics can show that something changed. Layered protection helps your team prove ownership and respond with a lot more control.
FAQs
Can AI prove a media file is authentic?
Not by itself.
The original text doesn’t discuss AI or media-file authentication. It focuses on a Supreme Court ruling that says getting historical cell-phone location data can count as a Fourth Amendment search.
From there, the case is sent back for review to decide whether the geofence warrant met constitutional standards.
Why use multiple metadata tools on one file?
Using multiple metadata tools on the same file helps you double-check what you’re seeing and spot details that a single tool might miss.
That matters because different tools can read, label, or display metadata in different ways. One tool may show a field another skips. Another may format the same data differently, which can make odd gaps or mismatches stand out.
The result is a more complete look at the file’s metadata. And when you compare outputs side by side, signs of tampering are often easier to spot.
What should I do if metadata looks tampered with?
If metadata looks tampered with, review it closely and compare it with the file details you’d expect to see in that situation. The goal is simple: look for mismatches that hint something may have been changed.
Pay close attention to inconsistencies in dates, authorship, device or software information, and file history. Small details can tell a bigger story.
If needed, use AI-based analysis to spot suspicious patterns and help guide a closer review.